Refinishing conga, need help - yet another one of those threads
24 posts
• Page 1 of 2 • 1, 2
![]() by fed » Wed Sep 27, 2006 1:51 am
by fed » Wed Sep 27, 2006 1:51 am
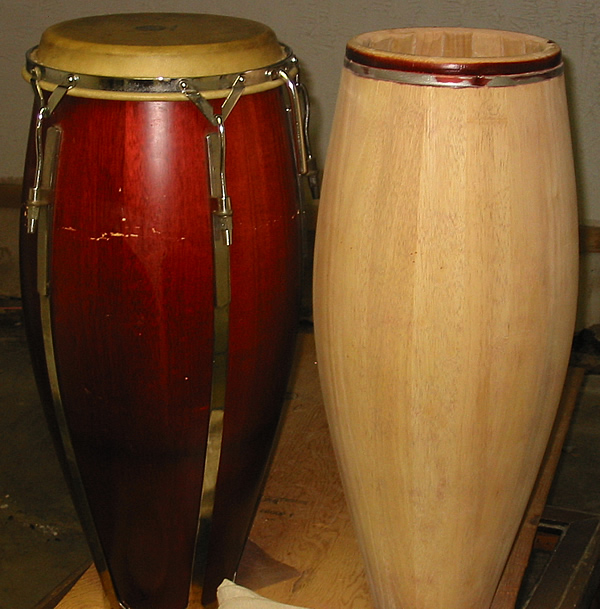
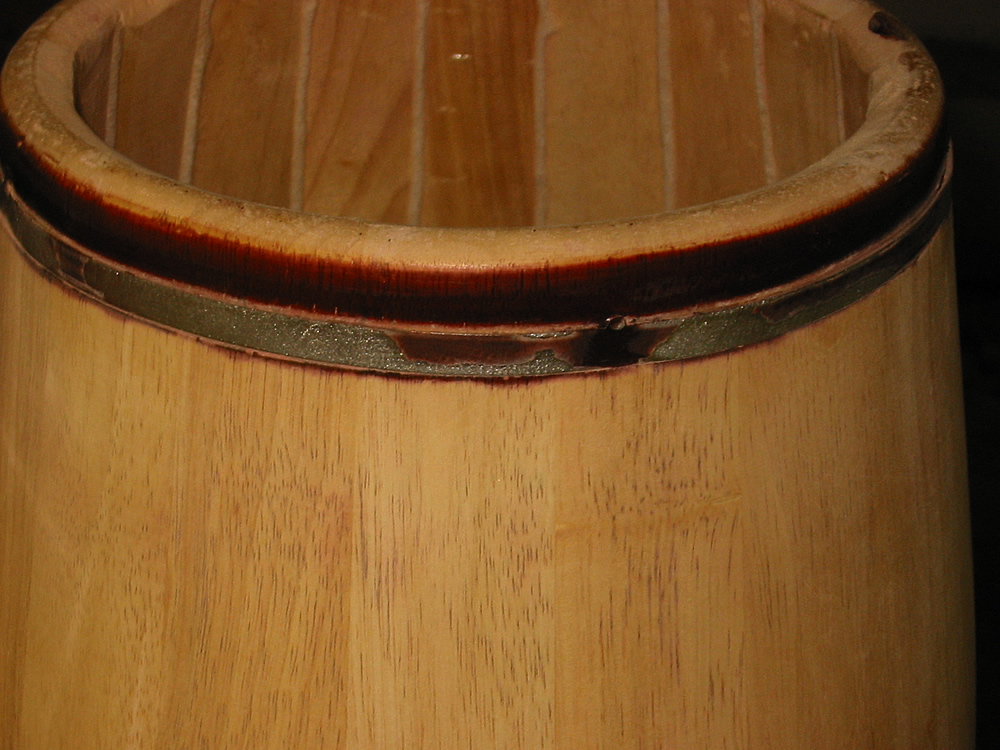
Hello, I am refinishing two congas that I bought a while ago. Some might remember me moaning about that purchase. Anyway, I have a question about a thin metal band I discovered under the head. It seems pretty loose, so probably not holding anything, it's held by little nails on top of it, not through it.
So the quesitons are:
1. can/should I remove it?
2. should I replace it with something that's tight around the top? My brother works in machine shop he could probably make me a band like that.
Also what sand paper should I use before putting finish on?
Any suggestions on the type/brand of finish I should use.
I would like to use a thin layer, so anything that I don't have to put on too thick would be great.
Oh and should I finish bearing edge?
Any other comments and hints are welcome.
thanks in advance to you all.
now for the pics...
Attachment: http://mycongaplace.com/forum/eng/uploa ... G_3443.jpg
- fed
- Posts: 61
- Joined: Tue Mar 15, 2005 3:57 pm
- Location: Upstate
![]() by taikonoatama » Wed Sep 27, 2006 11:03 pm
by taikonoatama » Wed Sep 27, 2006 11:03 pm
I'm the guy renovating that old Cuban quinto in another thread, so I've been researching the finishing as well. From reading and talking to people, here's what I'm going to do (though someone, please chime in if you see problems with this route)
(Assuming you've already sanded up to about 220 grit and have all the scratches removed, and blasted the dust off with some compressed air or at least wiped the dust off with some tack cloth.)
1. I used ZAR brand "Golden Oak" stain on my drum, though it's probably cedar and something else. My hardware store had test pieces with oak and pine for all the stains. Remember that with small test pieces, the color usually looks a bit darker when it's on a larger surface, like your whole drum. Just followed the directions - pretty much just wipe on, wipe off. Do a test up near the rim or something to make sure you like it before doing the whole drum.
2. Next I got two bottles of polyurethane spray, one gloss and one satin. Varathane Premium Polyurethane Oil-Based Wood Finish was recommended, and spray rather than brush-on to avoid brush marks, drips, etc. It'll take a lot longer for me to get a thick enough coat with the spray, but time isn't a major issue with this project of mine. In my case I want a satin finish and was told that the best way to do it was to start with a good base of gloss, which is a bit more durable, and then to finish with some coats of the satin. The other reason (so I was told by a woodworker friend) is that if you just use the satin alone, the wood itself can end up looking a little dulled because of the particles in the finish - they achieve that satin look through defraction of light off these particles and if you do all your coats with the satin, it's like looking at the wood through a haze. Just what I was told - we shall see.
3. Spray several coats (not sure how many here) of the gloss on, allowing to thoroughly dry between coats (according to directions on bottle). Also, lightly sanding with wet 320 grit sandpaper between each coat. The finish is waterproof and the wetness will prevent dust clinging to the drum and be easier to wipe down after sanding.
4. After a certain number of coats of the glossy, switch to the satin and repeat.
5. Stop when the finish looks good, and then top it off with a super-fine #0000 steel wool rubdown.
Doing my first coat tonight. We shall see...
Taiko
Update a week later: I think it turned out really nice! I had access to a potter's hand wheel so I could put the drum on there and sprayed as it was turning - I think that helped get a really consistently smooth finish. Did 3 good coats of gloss and then 3 of satin. No drips or splats or brush marks or anything. The finish is still thin enough to see the texture of the wood grain, which is nice.
Edited By taikonoatama on 1160372814
-

taikonoatama - Posts: 322
- Joined: Tue Mar 29, 2005 10:11 pm
- Location: San Francisco Bay Area
![]() by Sakuntu » Thu Sep 28, 2006 2:38 am
by Sakuntu » Thu Sep 28, 2006 2:38 am
Fed, Nice Flotunes! I refinished a toca a while ago but it didn't come out the way i wanted. Hope you can learn from my mistakes. I sanded it down to 100 grit sand paper-too course. I then used minwax stain and applied it with a brush...not bad but it got too thick in some spots. took a while to dry If i was to do it again I would use a cloth and apply it like that. I applied helmsman polyurethane high gloss interior/exterior varnish....again with a brush...bad move on my part...brush marks were evident. so you see all of my mistakes...I also tried to rush the project so i could use the drum...patience is the realy key with these projects too...So i learned a big lesson from all of this...just wanted to share with you so you don't make the mistakes I made. Onile did his palladiaums with 400grit sand paper, and several coats of minwax statin. he then buffed the crap out of them to get a nice satin shine. thats an Idea too...Youre in Rochester right? shoot me an email if you wanna talk more about [email]it...sakuntu@juno.com.[/email] good luck!
Sakuntu
- Sakuntu
- Posts: 282
- Joined: Thu Jun 08, 2006 1:52 am
- Location: Rochester, New York
![]() by fed » Thu Sep 28, 2006 12:35 pm
by fed » Thu Sep 28, 2006 12:35 pm
THanks guys for great replys. I am reading all other refinishing threds, and searched for some too. So taikonoatama I am watching your progress please post pics and any tips if you can.
That was good tip about blowing dust off with a compressor, if only I had one. might be able to borrow though.
Sakuntu, yea I am here in Rochester. Thanks for sharing your expirience. I am in no rush with these drums so I am going to take my time. But then I would like to get to finishing before it's too cold. We'll see.
- fed
- Posts: 61
- Joined: Tue Mar 15, 2005 3:57 pm
- Location: Upstate
![]() by ozrivera » Fri Sep 29, 2006 8:56 pm
by ozrivera » Fri Sep 29, 2006 8:56 pm
Fed
i refinished a pair of meinl marathons that i had for about 10 years. they came with a satin finish and i didnt
want to sand them down to the wood, i wanted to keep the stain that was already on it.
i began by sanding with a 400 grit sandpaper. and smoothed the surfaced, there were a couple of dings that i knew i couldnt get out since i wasnt sanding all the way down, so what i did was, with a black sharpie permannent marker i colored all the dings and it made it look like the dings were wood markings.
after that i used a car paint sprayer that i bought for like $30. and sprayed it with minwax polyurathane, the first coating was terrible because i used a thick polyurathane (yellow label) instead of a thinner polyurathane (black label) the first coat had runs and drips so i was back at square one. resanded everything with a 220 and then 400 girt sandpaper and i was ready to spray again. this time i tested the sprayer on a piece of wood and kept getting the same results even thining the polyurahtane 1 part urathane 2 parts thinner. went back to the hardware store a compared the different polyurathanes and just by shaking the can i knew i was using the wrong one. grabbed the one that was the thinnest which was the minwax with the black label. tested again on piece of wood, and then went to town. i sprayed them four times each wet sanding them with 400 grit in between sprays. and the finish is incredible they are super shiny and smooth the dings it had before are hardley even noticeble. anyways
if you can get a sprayer do so, the finish will look a lot smoother and better.
good luck
oz
Pa-tra ni-pa cojer impulso.
-

ozrivera - Posts: 223
- Joined: Thu Jun 08, 2006 12:25 pm
- Location: Corpus Christi, Texas
![]() by bongoron » Sat Sep 30, 2006 12:58 am
by bongoron » Sat Sep 30, 2006 12:58 am
Please check the compressor you use to make sure it is an oilless type, or that it has an inline oil filter! The oil will make a mess of your finish if not. A fine mist of oil or even small spots are very commmon with unfiltered oil-lubricated compressors. Also, even the oilless type can and will spray some moisture onto your wood if you don't use an inline water filter. I prefer a high quality microfiber dust cloth for this, after brushing off with a soft brush, or using a high quality tack cloth. I have painted many things from cars to motorcycles to guitars to PVC baton cases, and highly recommend the microfiber cloths. They get it clean and it stays dry in the process.
God bless!
-Ron
Edited By bongoron on 1159578019
God bless!
-Ron
Edited By bongoron on 1159578019
-

bongoron - Posts: 179
- Joined: Sun Jan 22, 2006 1:15 am
- Location: Missouri
![]() by fed » Sat Sep 30, 2006 3:35 am
by fed » Sat Sep 30, 2006 3:35 am
bongoron wrote:Please check the compressor you use to make sure it is an oilless type, or that it has an inline oil filter!
God bless!
-Ron
Thanks again for the tips guys. All very appriciated
bongoron, is there another good way of cleaning dust off, other then compressor? Oh and God bless you, bro
I just re-read your post and I think microfiber cloth is the other way, right? or is that a compressor with microfiber cloth? Please, exuse my ignorance.
Any type or brand of stain you guys can recoment that is easiest to put on. As I understand "polyurathane" is clear stuff you put on after stain or paint for protection, right?
Just to let you guys know, I am sanding to the wood as you see on pics, I am not being overly gentle ither. I got 60 grit out and it works good for stripping finish off. I am almost done with second one. Then I'll get 220 or something out and smooth it.
Thanks again.
Edited By fed on 1159587437
- fed
- Posts: 61
- Joined: Tue Mar 15, 2005 3:57 pm
- Location: Upstate
![]() by bongoron » Sat Sep 30, 2006 5:10 am
by bongoron » Sat Sep 30, 2006 5:10 am
Just a cloth, and you can shake it out in a different area if it fills up. Plus they are washable! Also cheesecloth or automotive tack cloth, although they are not washable. I've just had a few bad experiences with spitting compressors that made more work for me because I was lazy and didn't put a new filter on. If you can borrow an oiless compresor and put a water filter on it, you'll be fine. I didn't mean to imply it can't be done...just wanted to give you a headsup on the precautions to take.
God bless!
-Ron
God bless!
-Ron
-
bongoron - Posts: 179
- Joined: Sun Jan 22, 2006 1:15 am
- Location: Missouri
![]() by CongaTick » Sat Sep 30, 2006 11:40 am
by CongaTick » Sat Sep 30, 2006 11:40 am
Haven't refinished congas but have done a bit of other refinishing and not having a compressor, this is what i do. Take a cloth -- any cloth will do, perhaps an old dish cloth or face towel- and whip your wood project with it! (Okay, I know that sounds obscene, but just hang in) Yep, whip the hell out of it, (outside, preferrably)which cleans it really well. Then I take my shopvac and go over the project head to toe. Repeat the process once more and the wood work is clean as a whistle.
- CongaTick
- Posts: 1256
- Joined: Sun Dec 29, 2002 3:49 pm
![]() by fed » Mon Oct 02, 2006 12:45 pm
by fed » Mon Oct 02, 2006 12:45 pm
bongoron wrote:Do you use the soft bristle attachment on the shop vac? That seems like a super way to do it! Dust mask or upwind I presume. :laugh: Does the conga cry for long?
I just bought one of those attachements, cause I couldn't find the one that came with vac. So I am planning to try it. I was sanding outside so didn't need the vac yet.
I think it's "happy" to get a new finish and be used
- fed
- Posts: 61
- Joined: Tue Mar 15, 2005 3:57 pm
- Location: Upstate
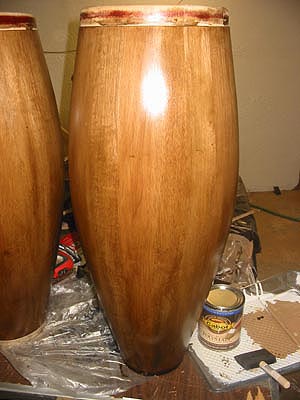
![]() by fed » Sat Jun 23, 2007 4:35 am
by fed » Sat Jun 23, 2007 4:35 am
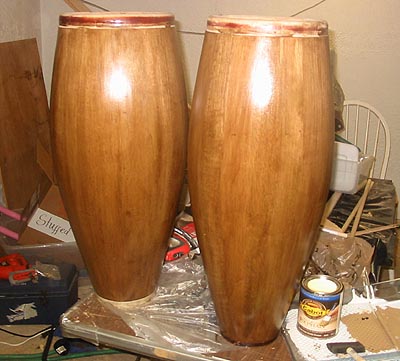
OK, It's warm here in Upstate NY and I finally got to putting finish on congas, cleaned hardware, I have new skins for them too from moperc, Probably will mount tomorrow. So here is a finish job...
Attachment: http://mycongaplace.com/forum/eng/uploa ... 90_web.jpg
Attachment: http://mycongaplace.com/forum/eng/uploa ... 90_web.jpg
- fed
- Posts: 61
- Joined: Tue Mar 15, 2005 3:57 pm
- Location: Upstate
![]() by fed » Sat Jun 23, 2007 4:37 am
by fed » Sat Jun 23, 2007 4:37 am
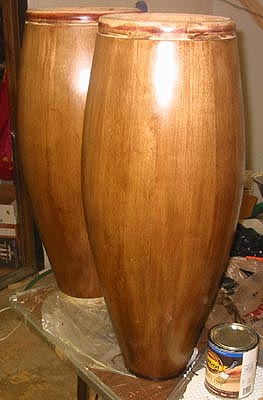
They look more brown on the photo then they really are ...
It's more of a black tint
Attachment: http://mycongaplace.com/forum/eng/uploa ... 91_web.jpg
It's more of a black tint
Attachment: http://mycongaplace.com/forum/eng/uploa ... 91_web.jpg
- fed
- Posts: 61
- Joined: Tue Mar 15, 2005 3:57 pm
- Location: Upstate
24 posts
• Page 1 of 2 • 1, 2
Return to CongaSet and accessories
Who is online
Users browsing this forum: No registered users and 26 guests