Make your own gwoka. - Step by step explanation.
72 posts
• Page 2 of 5 • 1, 2, 3, 4, 5
![]() by akdom » Thu Sep 29, 2005 5:10 pm
by akdom » Thu Sep 29, 2005 5:10 pm
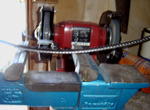
You will slowly see the rod bending. Repeat the previous step a few times.
Attachment: http://mycongaplace.com/forum/eng/uploa ... 846-15.jpg
Attachment: http://mycongaplace.com/forum/eng/uploa ... 846-15.jpg

-

akdom - Posts: 607
- Joined: Tue Jan 21, 2003 10:16 pm
- Location: France
![]() by akdom » Thu Sep 29, 2005 5:12 pm
by akdom » Thu Sep 29, 2005 5:12 pm
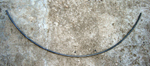
This is the rod after 3 passages on the vise.
Attachment: http://mycongaplace.com/forum/eng/uploa ... 960-16.jpg
Attachment: http://mycongaplace.com/forum/eng/uploa ... 960-16.jpg
-
akdom - Posts: 607
- Joined: Tue Jan 21, 2003 10:16 pm
- Location: France
![]() by akdom » Thu Sep 29, 2005 5:14 pm
by akdom » Thu Sep 29, 2005 5:14 pm
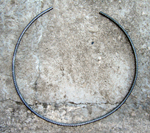
And this is the rod after 5 passages on the vise. As you can see, it takes some time to bend it, but if you hit the rod too hard, the circle won’t be even. Take your time.
Attachment: http://mycongaplace.com/forum/eng/uploa ... 042-17.jpg
Attachment: http://mycongaplace.com/forum/eng/uploa ... 042-17.jpg
-
akdom - Posts: 607
- Joined: Tue Jan 21, 2003 10:16 pm
- Location: France
![]() by akdom » Thu Sep 29, 2005 5:15 pm
by akdom » Thu Sep 29, 2005 5:15 pm
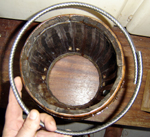
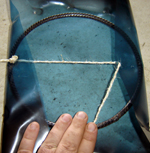
Once the two ends of the rod meet, check the diameter of the circle with the top of your drum. You want to leave about 3 centimeters (1 ½ inches) between the top of the drum and the ring.
Bend the second rod using the same process. In the end, you need to have one ring slightly smaller than the other in order to hold the skin correctly.
When you have the two rings finished, cut the excess rod so that the two ends meet and weld them (I had them welded at a local mechanic workshop).
Attachment: http://mycongaplace.com/forum/eng/uploa ... 116-18.jpg
-
akdom - Posts: 607
- Joined: Tue Jan 21, 2003 10:16 pm
- Location: France
![]() by akdom » Thu Sep 29, 2005 5:16 pm
by akdom » Thu Sep 29, 2005 5:16 pm
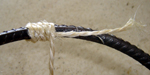
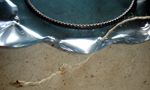
It is time to put the string around the smallest of the two rings. This is how Gwokas are traditionally made.
Start with one end of the reel and place it parallel to the rod. Spin the reel around the rod and the end of the string. Go around the rod a few times (3 for a small drum and up to 6 for bigger drums).
Attachment: http://mycongaplace.com/forum/eng/uploa ... 186-19.jpg
Start with one end of the reel and place it parallel to the rod. Spin the reel around the rod and the end of the string. Go around the rod a few times (3 for a small drum and up to 6 for bigger drums).
Attachment: http://mycongaplace.com/forum/eng/uploa ... 186-19.jpg
-
akdom - Posts: 607
- Joined: Tue Jan 21, 2003 10:16 pm
- Location: France
![]() by akdom » Thu Sep 29, 2005 5:17 pm
by akdom » Thu Sep 29, 2005 5:17 pm
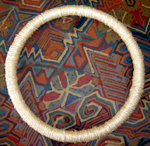
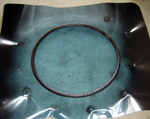
When you reached the desired thickness, make a knot to the end of the string.
This picture shows you what your ring should look like at this point.
Attachment: http://mycongaplace.com/forum/eng/uploa ... 264-20.jpg
This picture shows you what your ring should look like at this point.
Attachment: http://mycongaplace.com/forum/eng/uploa ... 264-20.jpg
-
akdom - Posts: 607
- Joined: Tue Jan 21, 2003 10:16 pm
- Location: France
![]() by akdom » Thu Sep 29, 2005 5:18 pm
by akdom » Thu Sep 29, 2005 5:18 pm
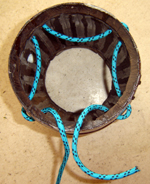
We are finished with the rings now. Get the rope and pass it through the wholes you drilled on the drum as shown on the picture.
Attachment: http://mycongaplace.com/forum/eng/uploa ... 326-21.jpg
Attachment: http://mycongaplace.com/forum/eng/uploa ... 326-21.jpg
-
akdom - Posts: 607
- Joined: Tue Jan 21, 2003 10:16 pm
- Location: France
![]() by akdom » Thu Sep 29, 2005 5:21 pm
by akdom » Thu Sep 29, 2005 5:21 pm
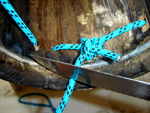
Without giving too much tension to the rope, make a knot to tie the two ends and cut the excess of rope.
Attachment: http://mycongaplace.com/forum/eng/uploa ... 464-22.jpg
Attachment: http://mycongaplace.com/forum/eng/uploa ... 464-22.jpg
-
akdom - Posts: 607
- Joined: Tue Jan 21, 2003 10:16 pm
- Location: France
![]() by akdom » Thu Sep 29, 2005 5:25 pm
by akdom » Thu Sep 29, 2005 5:25 pm
It is important to always burn the ends of the ropes you cut. This will prevent it from fraying.
Attachment: http://mycongaplace.com/forum/eng/uploa ... 714-23.jpg
Attachment: http://mycongaplace.com/forum/eng/uploa ... 714-23.jpg
-
akdom - Posts: 607
- Joined: Tue Jan 21, 2003 10:16 pm
- Location: France
![]() by akdom » Thu Sep 29, 2005 5:26 pm
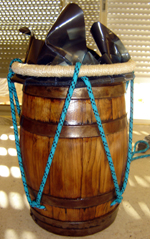
by akdom » Thu Sep 29, 2005 5:26 pm
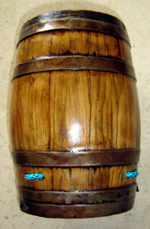
This is what the drum looks like at this point. It is ready to be skinned now.
Attachment: http://mycongaplace.com/forum/eng/uploa ... 796-24.jpg
Attachment: http://mycongaplace.com/forum/eng/uploa ... 796-24.jpg
-
akdom - Posts: 607
- Joined: Tue Jan 21, 2003 10:16 pm
- Location: France
![]() by akdom » Thu Sep 29, 2005 5:28 pm
by akdom » Thu Sep 29, 2005 5:28 pm
Now, for this drum, I am not using a natural skin but an X-ray film. I went to a local X-ray lab and asked for a few of them.
The skinning process I am using remains exactly the same if you are using animal skin (except that the natural skin has to be wet and shaved).
This method is very convenient if you are not used to putting skins on drums. I call it the “cross”.
If you already know about skinning drums, you can either skip this step. I personally only use it on very large drums but I wanted to include it on this one just to show it to you.
So, place the skin flat on a table or the floor and place the bigger ring on its center. Make some holes all around the ring at least 7 to 10 centimeter (3 to 4 inches) away from the ring. If the holes are too close to the ring, they might end up on the surface of the skin once it is set.
Attachment: http://mycongaplace.com/forum/eng/uploa ... 900-25.jpg
-
akdom - Posts: 607
- Joined: Tue Jan 21, 2003 10:16 pm
- Location: France
![]() by akdom » Thu Sep 29, 2005 5:29 pm
by akdom » Thu Sep 29, 2005 5:29 pm
Using a string with a couple of knots at its end, go through one hole. The knots must prevent the string from going through the first hole.
Attachment: http://mycongaplace.com/forum/eng/uploa ... 993-26.jpg
Attachment: http://mycongaplace.com/forum/eng/uploa ... 993-26.jpg
-
akdom - Posts: 607
- Joined: Tue Jan 21, 2003 10:16 pm
- Location: France
![]() by akdom » Thu Sep 29, 2005 5:32 pm
by akdom » Thu Sep 29, 2005 5:32 pm
Put the string through the hole opposite from the starting point.
Then go back to the hole next to the first one. Go on like this pulling slightly the string.
Once you went through all the holes, make a knot to secure everything. The skin should hold itself around the ring. Don’t apply too much tension to the skin at this stage. You need some slack to stretch it later on.
Attachment: http://mycongaplace.com/forum/eng/uploa ... 131-27.jpg
-
akdom - Posts: 607
- Joined: Tue Jan 21, 2003 10:16 pm
- Location: France
![]() by akdom » Thu Sep 29, 2005 5:33 pm
by akdom » Thu Sep 29, 2005 5:33 pm
Place the smaller ring with the skin on it on top of the drum. Place the other ring on top of it. Then pass the rope through one of the loops you made at the bottom of the drum. Pass the rope in between the two rings and around the top ring. Do this 4 times (once for each loop). Tie a knot to one of the ends of the rope to prevent it from slipping through the loop.
Attachment: http://mycongaplace.com/forum/eng/uploa ... 223-28.jpg
Attachment: http://mycongaplace.com/forum/eng/uploa ... 223-28.jpg
-
akdom - Posts: 607
- Joined: Tue Jan 21, 2003 10:16 pm
- Location: France
![]() by akdom » Thu Sep 29, 2005 5:35 pm
by akdom » Thu Sep 29, 2005 5:35 pm
You now have to adjust the skin and the two rings and start pulling the rope at the same time.
It is important not to pull the rope too much at this point. If you pull it too hard, the rings will slide on one side of the drum. Pull gently the rope going around the drum. The goal is not to stretch the skin yet but just to set everything up. While pulling the rope, make sure the skin doesn’t slip from the rings and make sure the rings stay as centered as possible. Pull the rope around the drum a couple of times until everything is steadily in place.
Attachment: http://mycongaplace.com/forum/eng/uploa ... 319-29.jpg
-
akdom - Posts: 607
- Joined: Tue Jan 21, 2003 10:16 pm
- Location: France
72 posts
• Page 2 of 5 • 1, 2, 3, 4, 5
Who is online
Users browsing this forum: No registered users and 17 guests